

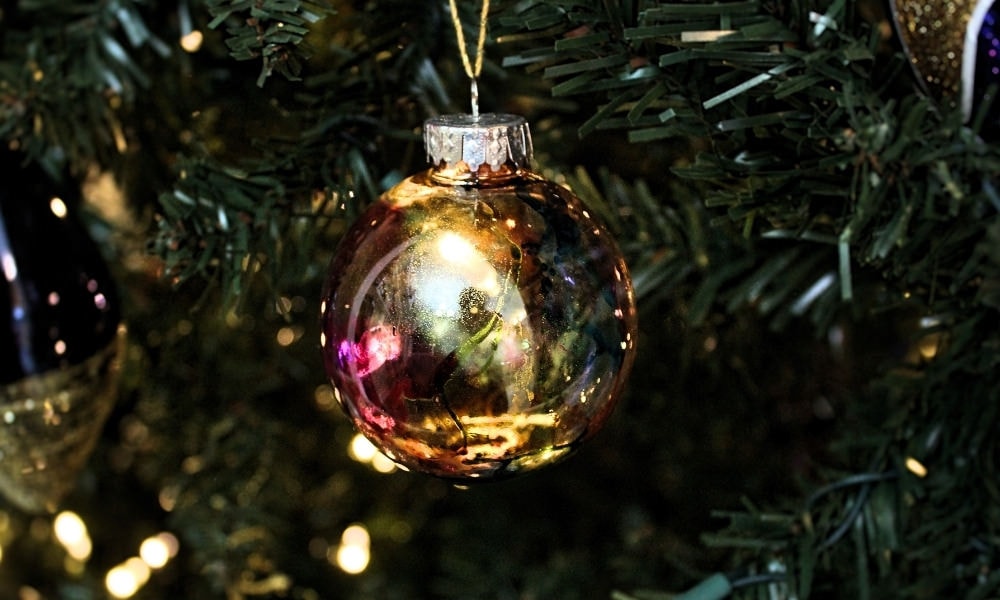
How To Make Alcohol Ink Decorations

These DIY watercolour-effect alcohol ink ornaments are so easy to make, and they'll look gorgeous on your Christmas tree! And if you've never worked with alcohol ink earlier, don't worry—I've included a bunch of helpful tips to get you started!
This post may contain chapter links, which means we may receive a commission, at no extra toll to you, if y'all brand a purchase through a link. We but endorse products, services and merchants that we have personally used/tested and consider of the highest quality standard. Please see our full disclosure for further information.
Have you ever worked with alcohol ink earlier? I discovered it concluding yr and I'm completely in love with information technology.
I was actually surprised at how much I loved it. It'south difficult to control exactly what it does, and I'yard a huge perfectionist. But once I tried information technology, I loved information technology so much that I started using it to create abstract pieces for my Etsy shop and pretty homemade coasters to souvenir to friends and family!
If you've never worked with alcohol ink, I really recommend trying it at to the lowest degree in one case. And this project is a great way to go a experience for it! It doesn't require a huge investment or any fancy equipment, and the resulting ornaments are so pretty!
Plus, because we chose to use plastic ornaments rather than glass, we don't need to worry about our kids breaking them!
Annotation: If you've never used alcohol ink before, be certain to read all the way to the bottom. I've included an entire section full of helpful alcohol ink tips right below the tutorial!
How to Make Alcohol Ink Christmas Ornaments
Required Materials
Here's what you'll need to make pretty homemade alcohol ink ornaments at home:
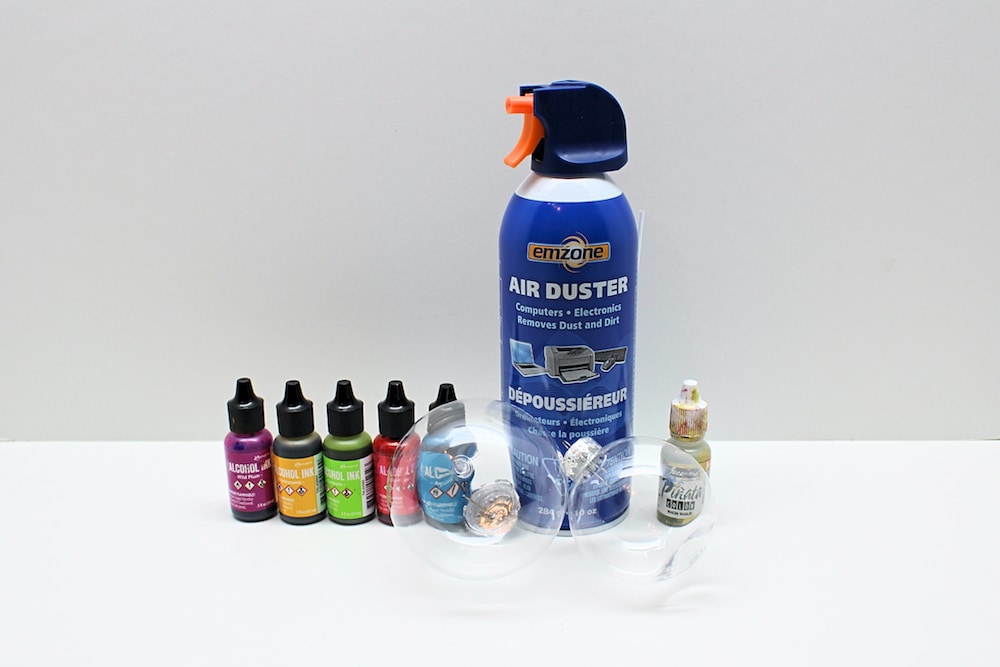
- Clear fillable plastic ornaments (if ever you tin't detect the size you want online, they tin also be institute in arts and crafts stores and sometimes even at the dollar store)
- Alcohol ink in several colours
- Compressed air (yous could probably fifty-fifty apply a straw)
- Alcohol ink gold mixative (optional)
Alcohol ink is a little pricey, so if you lot've never used it, I wouldn't recommend ownership more 1 pack until you know you like information technology. I recommend the Nature Walk, Beach Deco or Leap Break packs by Ranger—the colours are lovely and they make great starter sets! (They also tend to be cheaper than some of the others.)
Also, keep in mind that you really won't need much for whatever given project. Unless you lot're painting huge canvases (which is non something that beginners should be tackling as at that place'south a lot of prep work involved), you'll literally simply demand a few drops of each colour.
So there's actually no demand to buy a whole bunch of them unless yous fall in honey with them like I did!
Note: If you don't have young kids and aren't worried about your ornaments shattering, feel gratis to use glass ornaments instead of plastic. Simply we're about to welcome our fourth child under the historic period of 5, then as y'all can imagine, nosotros try to stay far abroad from anything breakable!
Recommended Materials
Above are the materials you lot'll absolutely need to make these ornaments, but I'd also recommend a few additional supplies:
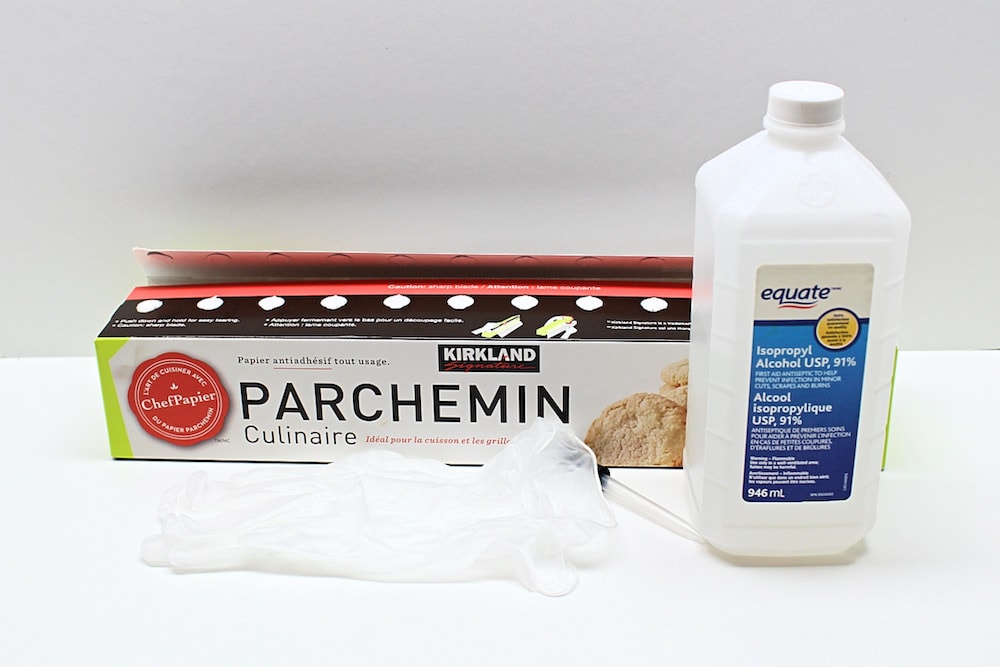
- Parchment newspaper (to protect your piece of work surface)
- Vinyl/latex/nitrile gloves (to avert staining your hands)
- Isopropyl alcohol
- Dropper (for the isopropyl alcohol)
I'll go more in detail about the isopropyl booze in the tips section at the end of this article!
Step-by-Pace Instructions
1. Remove Ornamentation Top
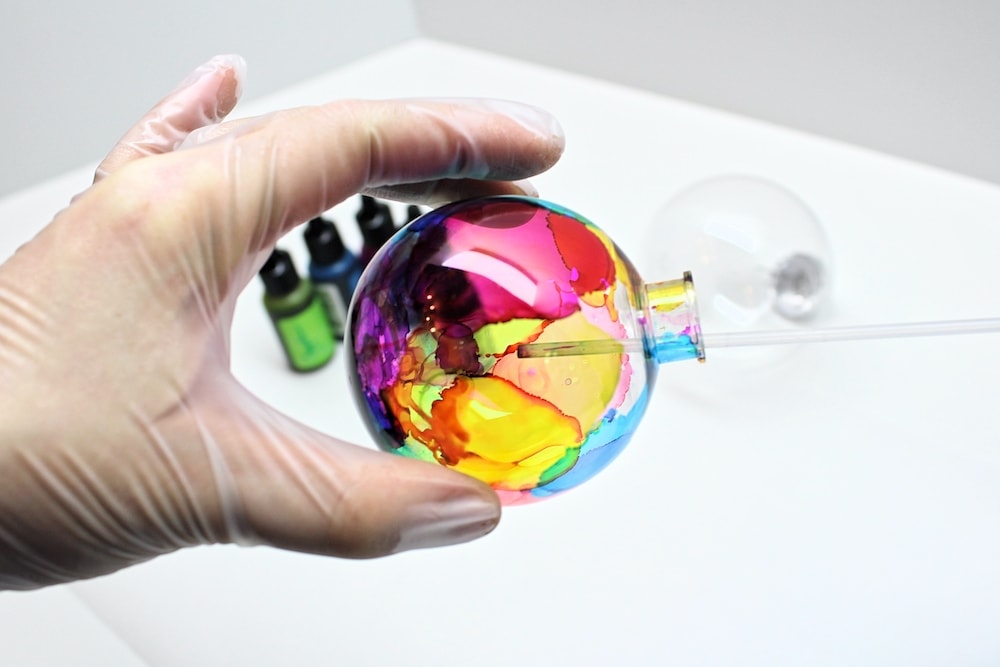
Start past removing the tiptop of your fillable ornament. For this project, nosotros'll be using alcohol ink on the inside of the ornaments to prevent staining and make them kid-friendly!
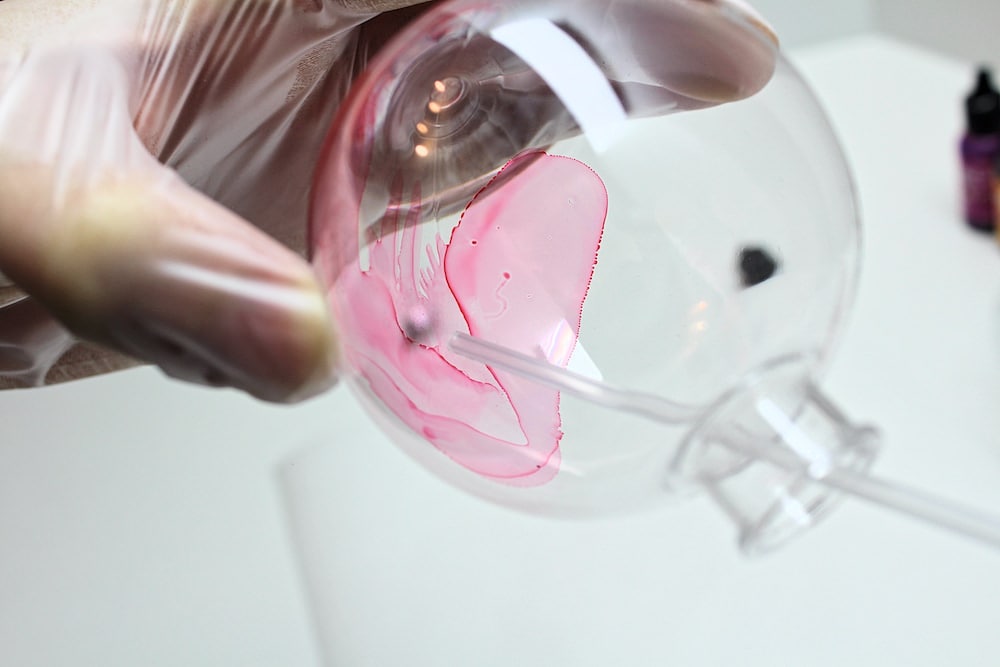
two. Add Booze Ink
Open one bottle of alcohol ink and cascade a unmarried drop into the decoration.
3. Add Air
Once you've added a drop of alcohol ink to the ornamentation, rapidly use the compressed air to spread it out and help information technology dry. If this is your start time using alcohol ink, make a note of how it behaves—this volition aid you do the residue of the project!
Note: I didn't endeavor it for this particular project, but if you don't have any compressed air, you could probably do this step with a harbinger. I rarely use compressed air when creating abstract pieces because I find that the air period is much easier to control with a harbinger!
4. Repeat Previous Steps
Echo the two previous steps as many times as yous like, with as many dissimilar colours every bit you like! (I used Wild Plum, Honeycomb, Limeade, Flamingo and Aquamarine past Ranger.)
Dry each drop of alcohol ink earlier adding the next, and endeavor to place all your drops in different locations in social club to cover the entire surface of the ornament. You'll notice that the colours don't mix anyhow—if a new drop is added on elevation of an former 1, it volition probable push it out of the fashion.
Have fun and experiment! And if ever you're not happy with the result, no need to worry—simply scroll down to the tips section to find out how to fix it!
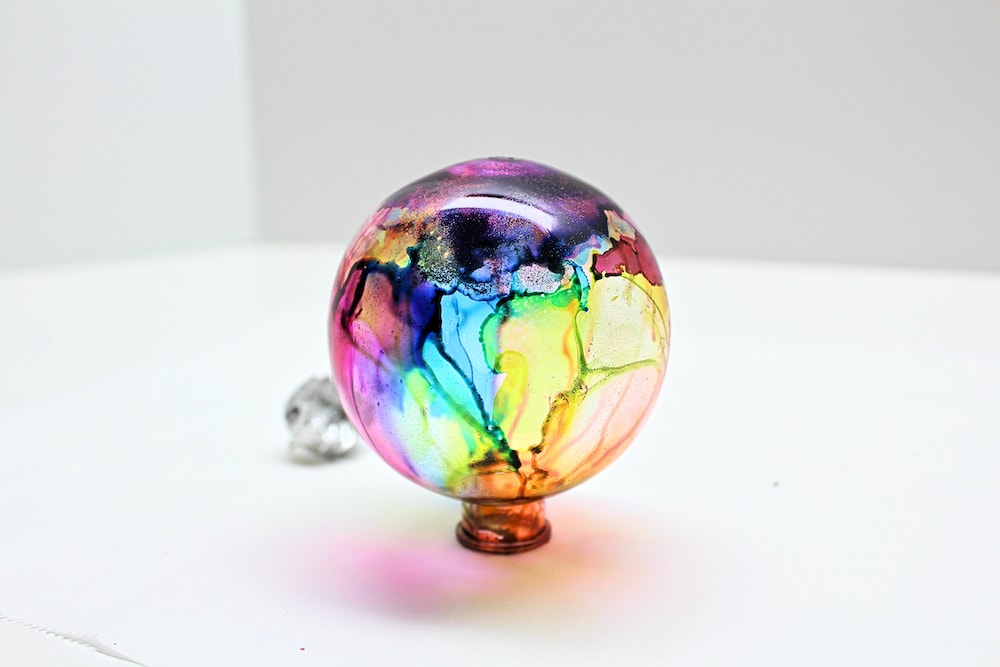
five. Add Golden Mixative (Optional)
Calculation a gilt mixative is totally optional—your ornaments will still look lovely if you only use solid colours to create a watercolour effect. Simply I loved the way the gold shimmered when the lights of the Christmas tree were turned on!
Gold mixative doesn't behave quite the aforementioned way every bit regular alcohol ink, so don't add too much to start with. It's meant to be mixed with a solid color, and then it will probably piece of work best if you pour a drib of color onto it before spreading it out with the compressed air.
Yous can also experiment with just swishing it effectually the ornamentation and forgoing the compressed air altogether to go out tiny specks of aureate all over!
six. Allow Dry out
Once you're happy with the style your ornament looks, place information technology upside down on some parchment newspaper for a few minutes. Booze ink dries pretty apace—especially if you use compressed air to help it along—only this will prevent any ink that'southward not dry out from pooling at the bottom of the decoration.
vii. Hang Decoration
Once you're satisfied that all the ink is dry (this shouldn't take long), place the meridian dorsum on your ornament and utilize your favourite method to hang it on your tree! We like to use gold thread to hang all of ours.
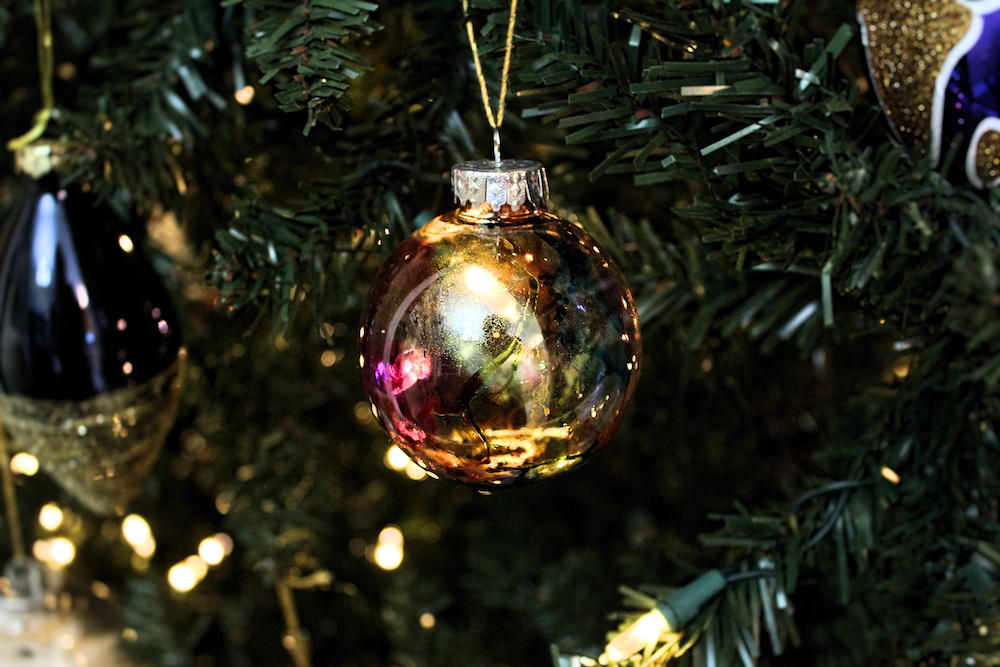
And that's it! I just love the way the gold specks look when we turn on our Christmas lights!
Booze Ink Tips & Troubleshooting
Since non everyone has worked with booze ink before, I've put together a little troubleshooting guide below to aid you out!
And since I'k obsessed with alcohol ink and have worked with it far more extensively than what's required for this projection, feel gratis to annotate with any questions that I haven't answered!
Where Tin can I Buy It?
Booze ink can typically exist institute in craft stores or online. Most of mine was ordered from Amazon, but I've too purchased a few sets from Michaels because they were overpriced or difficult to find online.
Which Surfaces Tin can I Use Information technology On?
Unlike most paints, alcohol ink is meant to exist used on non-porous surfaces such as plastic, metal, ceramic or glass. Yous can't even use it on canvas unless the canvas has been specially prepared with a latex primer!
With that in listen, remember that alcohol ink will not piece of work on regular paper. So if you want to test things out before doing this project, utilise a spare slice of clear plastic from the recycling or an extra tile that you have lying around from your latest renovation project!
(And if this project gets you hooked on booze ink, consider buying Yupo paper to experiment with it further! It's a special blazon of constructed paper that is non-porous and perfect for booze ink.)
How Do I Clean Information technology?
It's quite possible that even if you protect your work surface with parchment paper, you'll withal end upwardly with a few pocket-sized droplets of alcohol ink in places y'all don't want them.
Your first instinct may be to endeavour cleaning up the ink with a wet cloth—and panic when information technology doesn't come off. So I wanted to reassure you that information technology can indeed be cleaned. It just can't be cleaned with water!
If yous find whatsoever droplets of booze ink on your counter, tabular array or floor, simply pour a little bit of isopropyl alcohol onto it and use a textile or paper towel to wipe it upwards. The alcohol should make the ink come right off!
How Tin can I Set My Mistakes?
If y'all go through all the steps listed in the tutorial and aren't happy with the result, there'south no need to worry! Even when it seems dry out, alcohol ink art is never permanent unless you add a special fixative to it that prevents it from beingness reactivated by booze.
And so if always you lot're unhappy with how your ornamentation looks, only pour a little bit of isopropyl alcohol into it to reactivate the alcohol ink. Depending on how much alcohol you add together, yous tin use this fob to alter certain portions of your design, or even to restart the whole projection from scratch!
Related Homemade Christmas Decorations
Looking for more fun DIY Christmas decoration ideas? Cheque out these articles:
- Easy Feather Ornaments (2 Means!)
- DIY Santa's Clothesline (with Gratuitous Template!)
- Easy Twine-Wrapped Ornaments
- Dollar-Store Ribbed Glitter Ornaments
Y'all can also subscribe to my newsletter to receive fun craft and activity ideas right in your inbox! Subscribers also proceeds admission to my gratuitous printables library as well equally to fun bonuses that aren't available anywhere on my site!
Source: https://thecraftathomefamily.com/watercolour-alcohol-ink-ornaments/
Posted by: bermudezintond1957.blogspot.com
0 Response to "How To Make Alcohol Ink Decorations"
Post a Comment